Showing posts with label project requests. Show all posts

Saturday, November 11, 2017

Twin beds part III: the finish. Or at least most of it.

Whelp, should have seen that coming. Who would have guessed, starting a new job and going to school meant there wasn't much project time around here for a while. But I managed to get some time this weekend, and I'm still not that much closer to getting anything finished. Turns out having someone else pick out the finish didn't save me any time on these. In fact, the girl picked a color I couldn't really find, so I had to get creative which even added some time.

And it's not like they picked crazy colors either. The boy went with red, and the girl just wanted pink. Plain pink. Apparently not a lot of paint companies have a plain pink furniture paint, but fortunately getting red for the boy meant I could use some white I already had and hopefully make a pink she found acceptable. That sounded a lot more acceptable to ME vs paying three times for pink matte than I paid for red glossy.
And whew! The red we went with is REALLY RED. Like, fire engine red. It works for the boy, since he wants pokemon sheets (ugh) to go with it.
Since I had white in the same paint type already, I hoped I could mix them and get an acceptable pink. What's more, I wanted to make enough that I didn't run out in the middle of the bed and have to try and mix more.
You know what would be good for a project like this? Those old folgers coffee cans that every dad seemed to have in his garage when I was a kid. I don't have any of those, but I do have some empty espresso cans around so that will have to do. It made me feel super-yuppie but gave things a lovely coffee smell.
Time to mad science some pink.

The blog motto: "Hey, that's not terrible."
Thankfully it worked. And something I learned: adding an extra complementary color can tone down the color you've created by mixing two other colors. The first mix was way too hot pink. I dropped a splash of blue in to make it a little more eyeball friendly, it worked great.
That is definitely pink
I've gotten the boy's bed entirely painted and polyed, and I'm trying to find the time to finish the girl's bed by next weekend so they can use them. It sounds like they already have mattresses ready to go, I just need to get them both completely finished before I break them down and take them over.
I also have some initials I was going to put on the headboard, but they might have to wait at this point. I'm writing this as a break from the actual paper I'm writing tonite; it's only an 8-10 pager, but I already cranked out a 5 pager last night and I admit, I'm starting to feel a little stressed about it. The longer one isn't due for a week but based on this week, I'm not going to have a lot of Mon-Fri time to get it done by midnight next Sunday, so here I sit for a while longer.

Thursday, November 2, 2017

Twin beds part II; getting things together

Wow, that was easy. I can't believe something like a screen door ended up taking nearly a month to get together but I can have two twin beds together in basically a couple of days. Well, at least they're ready to paint at this point.
 
With the head and foot boards done, all I had to do next was trim the 1x4's to size for runners, and pick up two more 2x4s to split and attach so I had something to put slats on once they're cut. Like I said, easy.

I glued the split 2x4s on and let them sit overnight before adding some 2" wood screws. I clamped a scrap of the trimmed 2x4 on each end to make sure they were centered and would fit into the joints I had cut out.
I've only cut slats for one frame, I was more itching to get things together.
With those done, I clamped both beds together as a dry fit, and screwed the runners in once I confirmed I had things how I wanted them. Two twin beds took up more space than I was expecting, but it's still workable.
I wanted to prime them both before I put the colors on but like an idiot, I didn't put a drop cloth down before they were together. Getting one down was a bit of a challenge and the extra time it took meant I had to stop after priming instead of getting the furniture paint out. Ooops.

So now we've come to the part of every project where things grind to a halt as I have to finish each bed to the exacting standards of my children. There's going to have to be some disassembly and labeling too, to make it easier to get everything back together at the in-laws' house when they're done. That might make for an interesting next post.

Monday, October 30, 2017

twin beds for gramma & grandpa's house, part I

The wife's parents asked me lately if I had any interest in building beds for the kids to use when they sleep over at their house. Apparently they're not fans of having two little space-heater-sleep-kicking machines in bed with them. Who knew? The only catch is that they are also thinking about moving into our neighborhood, so anything I build needs to be staging-friendly in case they go on the market. No problem, I think I can swing that.

Even better, I had some time off last week already, and even if I don't have any interviews since I accepted a job offer (!), I was more than happy to have a project to get going on. Nothing like finding yet another excuse to avoid schoolwork.

The goal for this project was matching beds with colors picked by the kids, simple and clean but strong enough to hold a twin mattress and a sleeping chunk of child. I wanted to make sure the mattresses were off the ground with some room for air circulation, and the frames need to be light enough that the in-laws could easily move them on their own if they needed to. You can imagine how this quickly started to seem pretty complicated for something so simple.

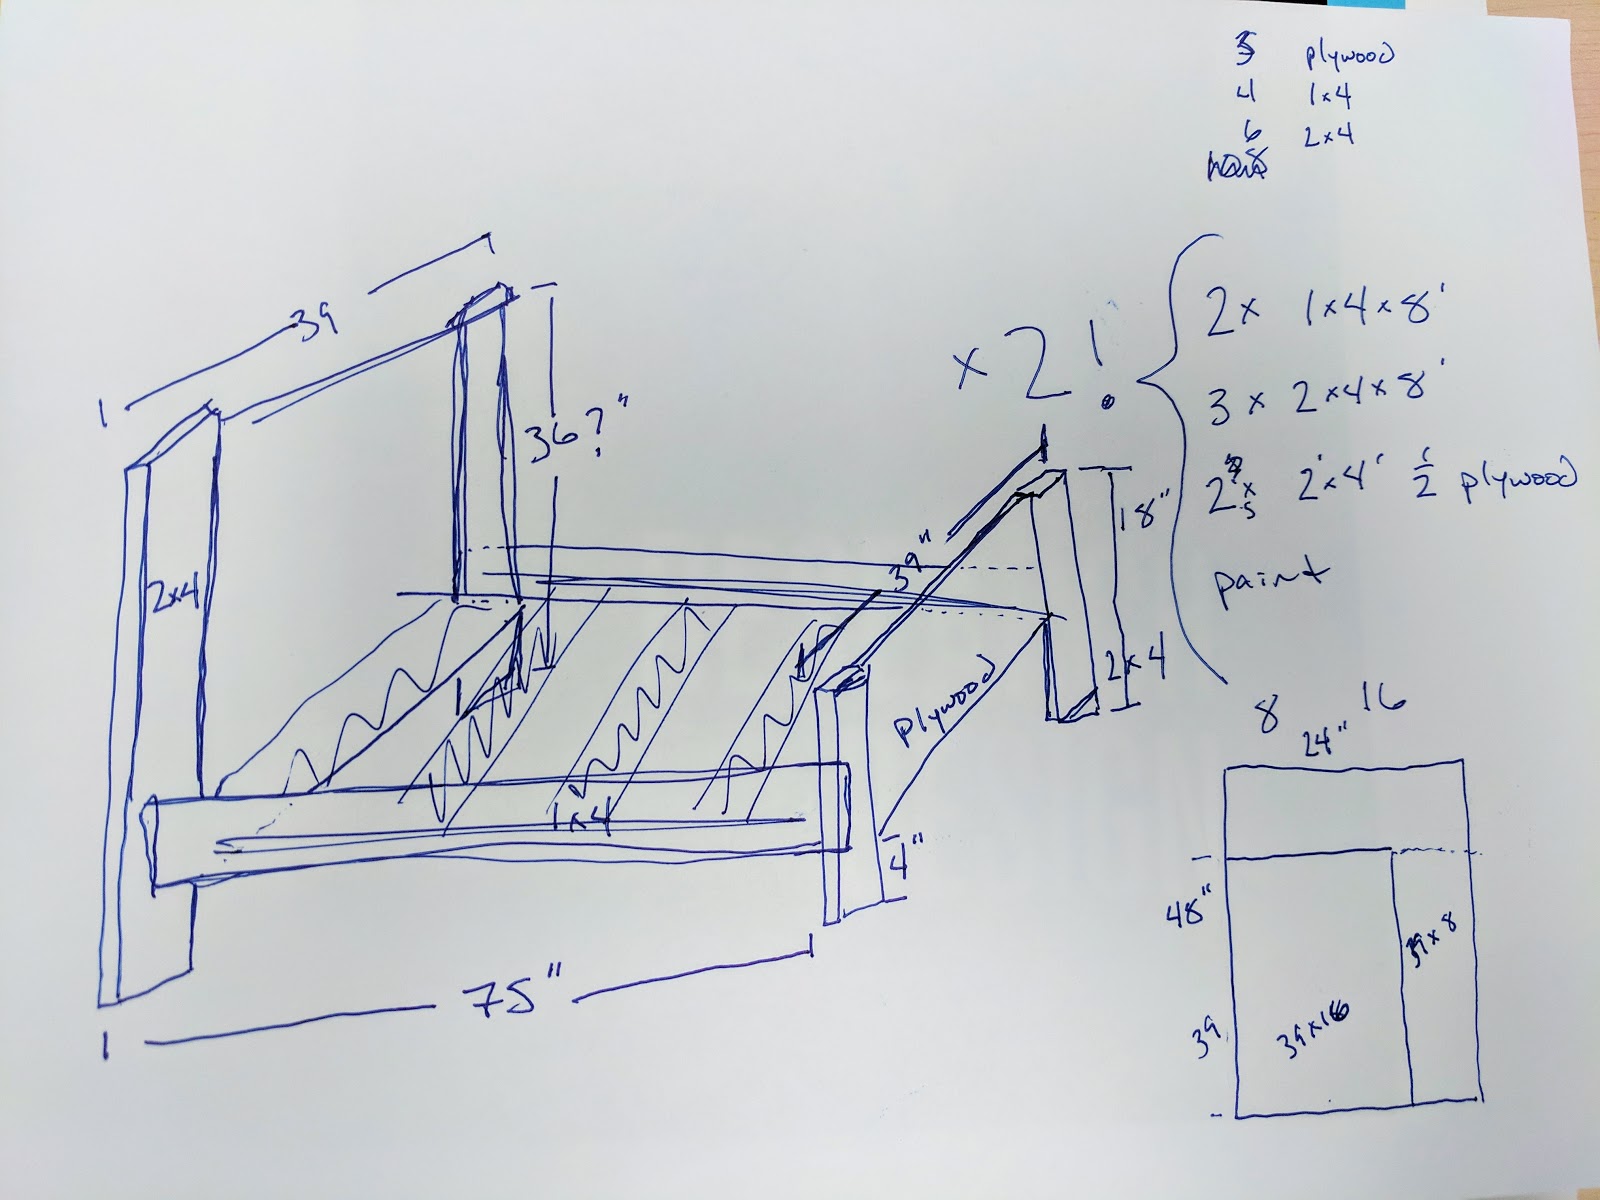
I started with a quick sketch and went from there. I thought a mix of plywood and construction lumber would keep things light but also paint-able and nicer looking if I put some prep work into it. I also wanted to use the router to try some joinery where the rails met the foot and headboards. It kept things budget friendly and meant I could get more done sooner since I was working with a simple plan with basic materials.

Buying enough materials for two beds ended up being an adventure. I can easily get one 2'x4' plywood into the dodge, but three was a bit much. I somehow ended up fitting 4 8-foot 1x4x and 3 8-foot 2x4s in around them too. Whew! Enough for the basic frames but I needed more 2x4s if I wanted something for slats to sit on later. 
I've got Ryobi stamped all over this project, I should just submit it there.

I had just cleaned up after finishing the door and started making another mess with the table saw. I trimmed off the rounded edges of the 2x4's to clean everything up and man, did they look way better just with straight edges. I was planning on just kregging the plywood to each for head and footboards, but why not get a 1/2 inch router bit and carve a dado for it? That would probably look a lot nicer. And I could buy another bit, always fun.
I also used a router to carve out space to attach the 1x4's for the sides, which was the original plan just with a smaller bit. Going bigger made it a little easier.
My god did I make a huge mess with this.


I did the runner dado on all four legs at once so things were lined up, b/c I doubt I would have been able to keep things straight otherwise. Holy god did I make a mess with these. Carving out 8 leg joints and 8 head/foot board joints meant I had piles of shavings all over the place.
I need better dust collection in the shop.
Hey, that almost looks like a bed.
Thankfully, one quick test fit later and I think we're in good shape. The plywood fits in the dadoes with a little persuasion, and the runner joints are level and balanced enough things stay up just in the dry fit. I know better than to say these will be done before I know it but I love how they've come together so far. 

Sunday, April 30, 2017

work for hire, as long as I get paid in pizza

Talking about how much I enjoy having the chance to work around the house kind of bit me in the ass this weekend; the in-laws are getting ready to sell their house and they asked if I wanted to put a backsplash in their kitchen. Being the good son in-law that I am I said yes, and that's the story of how I spent my Saturday and some of my Sunday putting tile up.
as blank spaces go it's not too huge

but there's plenty to work around
It's not a huge space, but they went with 3x6 tiles we had to buy individually, so both buying and getting started seemingly took an eternity out of my Saturday. They did do a lot of prep work though, so they had a pretty good idea of the number of tiles and bullnose tiles. Lots and lots of tiles.

so many tiles
Without a sheet I thought it was a little more stressful making sure the initial tiles were level, plus it was stressful doing it for someone else vs for my own kitchen, but once things got moving it was a pretty simple job. Even better, we picked up a dremel to cut the openings for outlets, and once we figured that out it was a much cleaner job than my last backsplash. I was a bit grumpy the late start meant I couldn't get it done in one day, but toward the end everyone came over (grandma had been watching the girl while the wife took the boy to a birthday party) for pizza so I couldn't be too crabby about it.
Saturday's quitting point
Day two went much quicker but still took longer than expected. My 90 minute estimate easily turned into twice that. More outlets and a window took me so much longer than two plain walls, pretty much reducing my weekend to the role of human pillow, which I am currently playing with the girl snoring away on me. Ah, dad-life.

The bright side is the wife knows how much I hate grout, so now that the tiles are on the wall my part of this project is done. The other bright side, other than getting a dremel out of this, is I'm wondering if I should build a console table for their entry way to help with staging. Always cool to find a reason to put a project together.

Wednesday, March 29, 2017

"Huh. It's a little small."

Yeah. That's what she said. Unfortunately.

The wife apparently wasn't thrilled with the L-shape instead of a straight up rectangle, but it was an easy enough build that I could easily add more length to either end if she needs more space. I should probably just do it anyway before things get planted so everything can get planted at the same time. There's plenty of room and these were an easy build.
Great. Now let's go dirt shopping.
Anyway, there was a break in the clouds this afternoon and I was able to beat the evening rain and get a liner in today, and I'm actually starting to get a little excited about what we might plant in this. May is just around the corner, and that means it will be time to get pumpkin seeds in the ground soon...

Tuesday, March 28, 2017

Workshops are controlled environments

Or at least more controlled than outside. Leaving the garden box in pieces made it easy to move out to the yard, sure. Even if my back was feeling slightly out of sorts. But putting it together in the yard turned out to be slightly more challenging than getting everything together in the shop with it's nice and level floor.
Placing them was deceptively simple...
But even with some challenge they came together okay.
With the help of some clamps to keep things together, the box eventually came together, albeit not quite as cleanly as it might have in the shop. It was too nice to work inside that day anyway.
Looks good, let's get some dirt. 20 cubic feet worth I guess.
This was a bit of rush, I was trying to beat the rain that was on its way in. Rain that hasn't left yet, since it's been raining pretty steadily since then, delaying getting any grass out or weed barrier down.  Again, that's a positive of working in a controlled environment. Oh well. The list of plants and veggies planned is getting pretty long, so hopefully the weather breaks again soon.

Friday, March 24, 2017

Spring, is that you? Time to garden.

It's almost time to get back outside, and that means convincing the kids not to run full speed off the landscaping around the fire pit. I think the wife asking for a garden box might be a way to also make them find another part of the yard to play daredevil.

I felt bad getting a request though, since it was one of the things on my list that I didn't get to last summer. But with the weather on track to get a little nicer now is a perfect time to get one ready. And an extra day off means I have a chance to rectify that sooner rather than later.

And since I had already meant to do this project, I had a list of materials in my head already, so a quick HD trip meant pretty soon I was unloading a bunch of cedar fence pickets, a pair of 2x3s, and some screws. Off to the races.
6-foot pickets, in decent shape.
Cut the 2x3 with a wedge to sink them into the ground.
We don't really know where to put these though, so I left things modular so I can move them out once we have a plan. That meant they came together really quickly, and with the extra time I could give them a light sanding before I sealed the exterior sides. These cedar pickets should be fairly resistant, but a little poly won't hurt either.
Test fit worked great at least.
They needed some sanding before getting sealed though.

The L-shape is to both help close out the fire pit and make things easier to walk around. A big rectangle means a lot of reaching, and with little arms planning on helping with the gardening an L-shape means direct access to anything that gets planted. Of course that's planning I'm more than happy to leave to the people with greener thumbs than mine.