Showing posts with label storage ideas. Show all posts

Monday, January 6, 2020

lightsaber(!) shelves

So. We went to disney over thanksgiving, and enjoyed ourselves very much. One of my favorite parts was obviously visiting Galaxy's Edge, where the kids and I each built our own lightsaber at Savi's. Talk about a semi-religious experience. Thank god we spent the past year putting points together to get the cost more palatable. 
Of course, now that we're home we just have these three awesome lightsabers sitting around. Power and control for the girl, elemental nature for the boy, and peace and justice for me. Red, purple, and good old fashioned blue. The boy picked up an extra kyber crystal too in yellow. I got it in my head to make shelves to display each of them, and I just managed to knock them out over the holidays.

I kept these very simple; bracketed floating shelves with a stand to display the entire saber. Apparently even just keeping the blade in the hilt will wear down the battery but why not display the entire thing?
Just like anything else, the plans for these changed from start to finish but I like where they ended up. I found different brackets I liked, so the shelves are just inverted boxes open on the bottom. Simple and messy glue up for mitered edges.

Simple scrap holders for the hilt.
Proof of concept, ready to go!
The brackets are heavy L brackets in studs. I kept my shelf unfinished minus a couple coats of poly. But I love it!

On the wall, not bad. 
Okay, I absolutely love it. My desk is a little SW crazy right now. 
Both kids wanted shelves to match their crystals, so I used the red I had left over from the beds for the girl and the boy picked out a yellow he thought would work. His got spray painted, which wasn't quite as clean but looks decent.
Two more. I did not mind having the work at this point. 
I put a small bit in to hold the boy's extra crystal.
Shiny. 
I love it. 
Not as crazy about the yellow but the concept is good. 
These kept me busy, which I needed over break instead of stressing about school. At some points I was really wishing these were functional and I could slice a motherfucker, but it's probably for the best if they're just for display.


Tuesday, July 16, 2019

This summer's big project

Just one post a month this summer? I guess it's a lot harder to do work around the house without Friday's off and a dissertation to write. So what's been eating up all my project time this summer? A new cooler box, or as I liked to call it the worst project I've ever been dumb enough to take on.

This started so innocently. Our neighbors were moving, and offered us their outdoor bar set for a halfway decent price. A bar/cooler with six bar stools for $40. Like an idiot, I said okay.
It sat in the yard as I wondered what I had done. 
Sat and collected a shit ton of rain water. 
The bar was just a big plastic cooler they had screwed some boards to and built a shoddy bar jutting off the top. And it was on the rustiest rack of wheels I had ever seen. One day into having this crap in our yard and I was feeling pretty damn dumb. 
First supplies run
But I was pot committed at that point and with a $100 home depot card burning a hole in my pocket I thought I'd try to make the best of it. Demo'd the "bar" off, took the wheels off, and muscled this plastic piece of crap up to the deck on my own.
These looked square at least. 
Getting this piece of crap up the steps convinced me it still needed wheels.
Without the wheels it was too low for a bar, so I built a frame to attach to the bottom on casters thinking I'd want it pub table height. But with all the rain we got through May and June, that collapsed as soon as I tried to move it around. It went back on in a much shorter fashion.

I thought 30 5" cedar pickets would be enough to wrap the damn thing, either my math or the board lengths were way off b/c I needed 15 more. Thankfully they still had some out at home depot after the initial trip. For all four sides, this meant taking off junk that was screwed onto the plastic, and putting something else on to use as a contact point for the boards to get glued/screwed to.
It stopped raining and got hot as balls at this point. 
With the cedar on it's not looking too bad, and I thought hinged lids would be easy enough to make to keep it functional but also good for storage. I was thinking tile but the wife suggested peel and stick to keep the weight down, which I thought was a good suggestion.
Mitered and routered to fit a 1/4 plywood panel. 
Again, doesn't look too bad. 
Of course my math was off on that too, and I needed to order a second set of supplies. 
Bought 15, ended up needing 25. Dammit. 
For weight these are fine, but there's not as nice as real tile. 
At this point I was ready to burn the fucking thing down. But the peel and stick wasn't hard to work with once I had enough. Getting the lids aligned right to put the hinges on was an adventure too, but at that point I was beyond taking pics and just wanted to be done. Thankfully all I had left after that was a quick run of caulk to tie the thing together and it was done. I'll have to stain it in the future with the same stuff we used on the fence but that can wait. 
It's already full of crap in this picture; two coolers & a tub of outside toys.
Whew. Now that it's done I don't mind it, but that was one of the most painful projects I've done around the house. The extra storage is nice, it's holding our two coolers and a few other odds and ends, and it does actually make a halfway decent bar top with people over. I might want to epoxy over the top in the future, but that's going to wait until I build my patience back up. 

Tuesday, April 30, 2019

re-doing cleat shelves

I had to spend the weekend downtown for a grad program residency, but before I left I had some time Thursday morning to redo my cleat shelves in the garage. I needed a chance to clean up a little and appreciated the chance to get a project done.

My circular saw fell off it's shelf this winter, taking down two of the bottom cleats on the way down. It's my fault for not make sure it was properly balanced; I was pissed about losing my shelf space. So I came up with a plan to add some back, but also get the circular saw a little sturdier on the wall.
Instead of individual cleats I picked up a 2x4 plywood and put it on the wall with construction adhesive, drywall anchors, and a line of wood screws in a stud. I think this should hold it.

With that up I put one of the old box shelves back up after popping the cleat off. I kregged it right to the board. Same with the circular saw shelf, more glue and a couple of wood screws through the back.
Add in another shelf cleat that I can figure out later and I think I've gotten a good deal of storage back. The bigger shelf is sturdy enough to stay on the floor, the table saw goes up against the wall, and I've got a spot for just about everything.
The best part was I could watch/listen to John Oliver while I was working. This set up is working well; if the dog was interested in staying in the shop vs the yard it'd be just about perfect. 

Monday, March 4, 2019

Adding xbox storage

With the SSD swapped in, now I have both an old HDD from the laptop, plus an old 3.5 inch drive from who knows where just laying around. I picked up enclosures for both of them, so why not add one to the xbox for more storage.
For the 3.5, obviously
Plus the cheapest 2.5 case I could find.
Neither of these are the biggest drive; they're both only 500gb. What the 3.5 has on it though is a decade's worth of pictures going back to 2005, which includes adopting Payton, getting married, and going literally all over the country - there are pics on there from San Francisco, multiple trips to New Orleans, Portland, Seattle, Vegas, New Mexico, even some from Jamaica and Mexico. Basically all the places you can go when you don't have kids. Looking at them was like seeing a slideshow of the last 15 years of our lives. So happy this project made me get these re-connected.
All systems are go; you can feel it spinning in the case.
Initially I was a little paranoid about immediately turning around and reformatting the old laptop HDD. But things seem fine, and I hate having an open-ended project just sitting around, so let's connect it to the xbox and fire things up:  
Ah, look at all that new space!
This was worth doing; even with just a handful of starter games I was already starting to get worried about storage space on this thing. Picking up Return to Arkham this weekend didn't help. 

So where'd this xbox come from? The wife and kids thought it would be a fun christmas present for me last year. They were right, for sure, but after the holidays ended and classes started, my gaming time hit zero. Add a puppy into that mix and it's almost in the negative. Someday I will have time to game again. Someday...when my doctorate is done and I can once again sit back and enjoy downtime that is truly downtime. And when that day comes, even if it comes for the kids and not me, we'll have more room for more games now. Good times. 

Friday, July 27, 2018

Adding some t-tracks

This sore throat just won't got away, but I'll be damned if I let some summer cold I caught from my damn wiener kids' daycare stop me from getting this table done.

Having mentioned we've lost wine glass storage, I want to put some racks at the top of the cabinet space on the table. Thankfully I have enough scrap around to pretty much recreate multiple rows of these in the build.
I used the old storage as a guide for how far apart they should be and think it worked out pretty well. I like having efficient storage built into a project like this, I just hope I do it well enough that it works long term. We don't use a lot of these glasses, but it's not like I want them breaking if they're in here.


The pictures pretty much speak for themselves at this point, there's not a lot of design going into how these come together. I ended up with 5 racks instead of the 6 we had, hopefully it doesn't mean throwing out too many glasses we don't use anyway.


With these in and the door ready, I'm hoping it's time to get sanding and staining. The legs I ordered should be here in the near future, and it's going to be hard to resist just getting them on and bringing this upstairs at that point. Better that it's ready to be finished first.

Friday, October 20, 2017

Reusing the wire shelves

With the cleats up in the garage, I now had to think of something to do with the wire shelves not being used.

These shelves were left in our condo from the previous owners, and they made our move with us after keeping them as pantry shelves. Honestly I couldn't bring myself to throw them out even if they're not overly useful. We had to cover them in cardboard to use them in our pantry, and they weren't very helpful in the garage. But there's got to be a better use for some of these than the garbage dump, so I figured I'd build a frame to put the shelves on to give the boy some additional closet storage.

The closet isn't too big, but some extra shelving in there would help get some boxes off his floor and out of the way. Hence the left over 1x4s getting split into 1x2s so I could play around with building a frame to set the shelves on to make the most of the space.

Easy frame up to fit the shelves on.
Even though I put them all the way together, this wasn't the sturdiest frame so I ended up just carrying the individual pieces upstairs to assemble in the closet.
Shelves in, no what to do with the middle?

They ended up really helping get the closet a little more organized. Right now, with no real clothes to hang up, this closet became a dumping ground when the boy has to clean his room. Hopefully putting these in there keep him from filling up the bottom of the closet just throwing junk in.

I ended up keeping the middle open to let one of the girl's costume dresses hang. I have enough scrap to glue together another shelf to add on, that might be a small extra project to glue and plane something together. For now, I'm happy with keeping some more stuff out of our garbage pile.

Monday, October 16, 2017

more cleat shelves

Since the treadmill's in the garage, every time I run and there's an incomplete project in there it gets me a little distracted. Ignoring the un-finished cleat system was damn near impossible, so I made sure I had some time this weekend to put a few more up. Now that they're up, hopefully I can run in peace for a few days.

One thing I like this project is not everything has to look the same, so we have a few different shelf designs up on the wall. Some are simple scrap pieces sticking off the cleat to hang stuff on, some are boxes, some are simple lips, and the circular saw gets a fancy angled shelf. I ended up really liking the shelf I made first, so I used the leftover plywood to build another smaller one, and then a third with older scrap.
I'm particularly proud of this one; I broke the handles off old paint sponges and used them as dowels to hang stuff off after chiseling them small enough to fit in 3/8 drill holes. I use it all the time with my headphones on there.
The box is probably the most useful shape these have taken.
 

I'm not sure I've landed on my final layout yet but I like how this has rounded into shape. All my painting supplies went on the 2nd box, and lots of other stuff ended up off the bench and on the wall. After I cleaned up I was pretty happy with the space, and there's still room for more shelves if needed.

The best part is having room for the saw under everything, so it's a shorter move to use it. It might get moved later, and the mower is about to get stored for the winter anyway, but this is leaps and bounds better than what it was two weeks ago. Storage solutions are the best.

Tuesday, October 10, 2017

French cleat storage project

Turns out wanting to take a break didn't last very long. Who would have guessed that after spending all day on a PC at work I would get a little bored spending hours in the evening on a tablet at home going over course materials? Oh well. I'll just have to find some time to squeeze in DIY work to take a break. Speaking of which, things have really quieted down around the house and I'm kind of itching for a project. So when I got a little frustrated trying to get all the kids scooters and trykes organized I decided to try and add some french cleat shelving and change how things are organized.
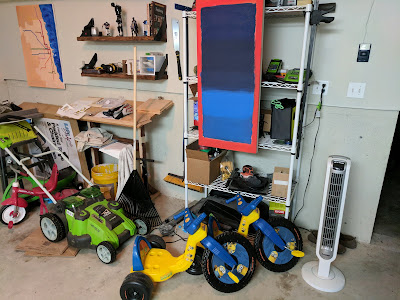
This is definitely not working.

A long holiday weekend turned out to be perfect timing since I had an early interview last week, leaving me some time afterwards to pick up some supplies at Menards. Not as much time as I would have liked though, b/c since I already had the day off I scheduled a phone interview somewhere else for the afternoon. Yikes. Possibly changing jobs and starting school at the same time? Sure, nothing like piling on options for stress to hit. Nothing some 6" 1x4s, two sheets of plywood, and wood screws can't take care of.

This was also a perfect job for the table saw. For the cleats I just split two 1x4's into two long strips with a 45 degree miter. Then all four pieces went on the wall, putting them on studs plus a few drywall anchors just to keep things tight against the wall. Easy, right? Maybe not.
I ended up not quite sure where the studs were with the finder. There's obviously one in the door frame, and probably one by the switches. But the blue line is a pipe, you can see it between the drywall and foundation. And the red lines on the left are probably studs, but they're way off any standardized measurement I could figure out. Of course, just like everything else in this house.
Testing some cleat fit. Had to work around some stuff already on the wall.
At least I didn't hit anything electrical drilling into the wall, so I think we're all good. Unfortunately, the cleats are only going on the top half of the wall since I don't really feel up to adding masonry bits to attach more. But that might actually work out better, since I want to park stuff under the shelves once they're all up.

At first, all I really want to get out of this is more floor space to park the mower, and a custom shelf for my circular saw. But the more I thought about it, the more I realized these could hold my planes, the jig saw, the sander, the router I still haven't used...the list grew and grew. Plus, looking at it now putting the table saw under there would mean less carrying back and forth every time I use it, which would be pretty great. I love this project.
Plus some extra split 1x4's I think I'll use later.

With the other interview looming, even though the cleats were on I only had time to build a big shelf and try it out, but so far it looks great. Thankfully I have plenty of scrap for more shelves and boxes to store stuff with, and a long holiday weekend gave me some extra time to get back to them. More on that later. But a big thumbs up on this project so far. Not only is it helping with storage, each shelf becomes another gadget to put together for a custom solution. So good.