Monday, October 30, 2017

twin beds for gramma & grandpa's house, part I

The wife's parents asked me lately if I had any interest in building beds for the kids to use when they sleep over at their house. Apparently they're not fans of having two little space-heater-sleep-kicking machines in bed with them. Who knew? The only catch is that they are also thinking about moving into our neighborhood, so anything I build needs to be staging-friendly in case they go on the market. No problem, I think I can swing that.

Even better, I had some time off last week already, and even if I don't have any interviews since I accepted a job offer (!), I was more than happy to have a project to get going on. Nothing like finding yet another excuse to avoid schoolwork.

The goal for this project was matching beds with colors picked by the kids, simple and clean but strong enough to hold a twin mattress and a sleeping chunk of child. I wanted to make sure the mattresses were off the ground with some room for air circulation, and the frames need to be light enough that the in-laws could easily move them on their own if they needed to. You can imagine how this quickly started to seem pretty complicated for something so simple.

I started with a quick sketch and went from there. I thought a mix of plywood and construction lumber would keep things light but also paint-able and nicer looking if I put some prep work into it. I also wanted to use the router to try some joinery where the rails met the foot and headboards. It kept things budget friendly and meant I could get more done sooner since I was working with a simple plan with basic materials.

Buying enough materials for two beds ended up being an adventure. I can easily get one 2'x4' plywood into the dodge, but three was a bit much. I somehow ended up fitting 4 8-foot 1x4x and 3 8-foot 2x4s in around them too. Whew! Enough for the basic frames but I needed more 2x4s if I wanted something for slats to sit on later. 
I've got Ryobi stamped all over this project, I should just submit it there.

I had just cleaned up after finishing the door and started making another mess with the table saw. I trimmed off the rounded edges of the 2x4's to clean everything up and man, did they look way better just with straight edges. I was planning on just kregging the plywood to each for head and footboards, but why not get a 1/2 inch router bit and carve a dado for it? That would probably look a lot nicer. And I could buy another bit, always fun.
I also used a router to carve out space to attach the 1x4's for the sides, which was the original plan just with a smaller bit. Going bigger made it a little easier.
My god did I make a huge mess with this.


I did the runner dado on all four legs at once so things were lined up, b/c I doubt I would have been able to keep things straight otherwise. Holy god did I make a mess with these. Carving out 8 leg joints and 8 head/foot board joints meant I had piles of shavings all over the place.
I need better dust collection in the shop.
Hey, that almost looks like a bed.
Thankfully, one quick test fit later and I think we're in good shape. The plywood fits in the dadoes with a little persuasion, and the runner joints are level and balanced enough things stay up just in the dry fit. I know better than to say these will be done before I know it but I love how they've come together so far. 

Wednesday, October 25, 2017

DIY screen door attempt

The table saw has gotten a ton of work since I won it this summer, but the router has been left pretty much alone. I got it too late to use on the media cabinet, and for whatever reason it's stayed in its bag since then. Well, that's over.

I was thinking about trying to put a screen door together. We don't have one and desperately need it in the fall and spring when temperatures are just right for opening the windows and airing things out. So since I had time off for another interview I figured I might as well see I could get a door started before it gets too cold to use. Plus, it helped me not think about interviews, so that was great. I should have done this sooner though, considering how it's suddenly in the 30's this week.

There are plenty of sites with ideas on this, so after some reading I basically just grabbed some boards, did some measuring, and let it rip. Eventually I realized I needed hardware, and paint, and an actual screen, so things rounded slowly into shape.
This picture was practically a month ago at this point. Unbelievable.

I started with nicer lumber than I usually do, getting three quality cut 1x6's at 8 feet. I cut them to the measurements I had for the front door frame, which of course weren't quite equal on either side. I hoped I could fudge it enough that it would be fine.

I broke two clamps on this project, for whatever reason.
Had to call it a day at this point, a good start at least.
I cut the third board into top, bottom, and middle partitions, and put the middle one in with the frame in the door. Looking good so far. I was planning on putting the kreg holes on the inside, and covering the seams on the front before I primed everything. Biscuits might be better for something like this but work with what you've got.
With the door taking shape it was time to give the router a test spin. That was a challenge, but after a few tests on some scrap I gave it a shot on the door. Not the neatest cuts all the way around, but I figured I could hide it with trim later. In any case the screen has somewhere to go now.
Hey, some of this doesn't look terrible. Not all it looks like that though.
I've never been a huge fan of the workbench that the previous owners had in this garage, and this project made me realize I probably have to build my own at some point. It's a weird combo of deep enough I have to strain to grab some stuff, but also too short to work with something like a door. I spent 80% of this job crouched on the floor, and it was not comfortable. At least I could put it up to clean things up with a chisel.
After making a mess with the router, I needed some trim. Instead of buying some I picked up a 2x2 and split it into three 1/2 inch strips, which I then cut to fit around the screen. Not fancy but they fit. I also filled the kreg holes with chunks of a 3/8" dowel I had around so there wouldn't be holes on the inside of the door. It's amazing what you can make on your own instead of buying pre-made with the right materials and tools.
Whew those router marks are a mess!
Primer on and testing the trim. I knew I had something at this point.
With that all done it was time to prime, paint, and seal. Like any other project this was the longest part of the process, since I had to let things dry and air out before painting again. A week's worth of rain didn't help with that either. Most of the posts I found about building a door painted with the screen on, which didn't make any sense to me. If I'm building a door, why not get everything finished without having to protect an installed screen. But now I saw why; I was itching to get the screen and trim on, that was the whole point of building a screen door. Unbelievably, I stuck to my original plan and tried to be patient while I found time to finish. 

We tried to match our front door as closely as possible, but didn't quite get there. It ended up not mattering too much, since we can't really see the front door through the screen anyway, but it gave us a nice color on the door. The wife was happy at least, which means the door can stay. So thumbs up to that. 

I did a full test fit with the trim all the way screwed on, which is good, b/c they needed paint touch ups at some spots. When they were finally dry again I sealed them while they were on the door, then took them back off so I could staple in the screen. My "hurry up and finish" genes were kicking in pretty bad at this point, but I wanted to make sure my janky routering was completely hidden. With things finally good enough I could staple the screen on and put everything back together. Before I did though I put a line of clear drying caulk around the screen, b/c why not. Any worth doing is worth over-doing.  

Well, it's at least identifiable as a door at this point.

With the door finally ready, I could put some self-closing hinges on and a latch, and viola, one screen door, just in time for Halloween. I've yet to have a positive experience hanging a door and this door is no different, but at least it's up and functional. I waited until it was up to install the latch so I could make sure it was lined up and not hitting the other door's hardware.
Very pleasant looking in the sun. Too bad it's so damn cold.

If I'm being honest I'm not crazy about the exposed hinges but I like this option versus putting them on the inside and adding a spring arm to get it to close by itself. But again, I ended up loving how this looked after spending so much time on it, and it really helped me keep my mind off of interviewing. Thank god the kids both had costumes picked out already and I wasn't working on those too. I seemed to have learned my lesson on that one.

Friday, October 20, 2017

Reusing the wire shelves

With the cleats up in the garage, I now had to think of something to do with the wire shelves not being used.

These shelves were left in our condo from the previous owners, and they made our move with us after keeping them as pantry shelves. Honestly I couldn't bring myself to throw them out even if they're not overly useful. We had to cover them in cardboard to use them in our pantry, and they weren't very helpful in the garage. But there's got to be a better use for some of these than the garbage dump, so I figured I'd build a frame to put the shelves on to give the boy some additional closet storage.

The closet isn't too big, but some extra shelving in there would help get some boxes off his floor and out of the way. Hence the left over 1x4s getting split into 1x2s so I could play around with building a frame to set the shelves on to make the most of the space.

Easy frame up to fit the shelves on.
Even though I put them all the way together, this wasn't the sturdiest frame so I ended up just carrying the individual pieces upstairs to assemble in the closet.
Shelves in, no what to do with the middle?

They ended up really helping get the closet a little more organized. Right now, with no real clothes to hang up, this closet became a dumping ground when the boy has to clean his room. Hopefully putting these in there keep him from filling up the bottom of the closet just throwing junk in.

I ended up keeping the middle open to let one of the girl's costume dresses hang. I have enough scrap to glue together another shelf to add on, that might be a small extra project to glue and plane something together. For now, I'm happy with keeping some more stuff out of our garbage pile.

Monday, October 16, 2017

more cleat shelves

Since the treadmill's in the garage, every time I run and there's an incomplete project in there it gets me a little distracted. Ignoring the un-finished cleat system was damn near impossible, so I made sure I had some time this weekend to put a few more up. Now that they're up, hopefully I can run in peace for a few days.

One thing I like this project is not everything has to look the same, so we have a few different shelf designs up on the wall. Some are simple scrap pieces sticking off the cleat to hang stuff on, some are boxes, some are simple lips, and the circular saw gets a fancy angled shelf. I ended up really liking the shelf I made first, so I used the leftover plywood to build another smaller one, and then a third with older scrap.
I'm particularly proud of this one; I broke the handles off old paint sponges and used them as dowels to hang stuff off after chiseling them small enough to fit in 3/8 drill holes. I use it all the time with my headphones on there.
The box is probably the most useful shape these have taken.
 

I'm not sure I've landed on my final layout yet but I like how this has rounded into shape. All my painting supplies went on the 2nd box, and lots of other stuff ended up off the bench and on the wall. After I cleaned up I was pretty happy with the space, and there's still room for more shelves if needed.

The best part is having room for the saw under everything, so it's a shorter move to use it. It might get moved later, and the mower is about to get stored for the winter anyway, but this is leaps and bounds better than what it was two weeks ago. Storage solutions are the best.

Tuesday, October 10, 2017

French cleat storage project

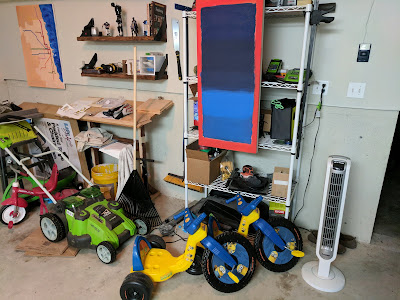
Turns out wanting to take a break didn't last very long. Who would have guessed that after spending all day on a PC at work I would get a little bored spending hours in the evening on a tablet at home going over course materials? Oh well. I'll just have to find some time to squeeze in DIY work to take a break. Speaking of which, things have really quieted down around the house and I'm kind of itching for a project. So when I got a little frustrated trying to get all the kids scooters and trykes organized I decided to try and add some french cleat shelving and change how things are organized.
This is definitely not working.

A long holiday weekend turned out to be perfect timing since I had an early interview last week, leaving me some time afterwards to pick up some supplies at Menards. Not as much time as I would have liked though, b/c since I already had the day off I scheduled a phone interview somewhere else for the afternoon. Yikes. Possibly changing jobs and starting school at the same time? Sure, nothing like piling on options for stress to hit. Nothing some 6" 1x4s, two sheets of plywood, and wood screws can't take care of.

This was also a perfect job for the table saw. For the cleats I just split two 1x4's into two long strips with a 45 degree miter. Then all four pieces went on the wall, putting them on studs plus a few drywall anchors just to keep things tight against the wall. Easy, right? Maybe not.
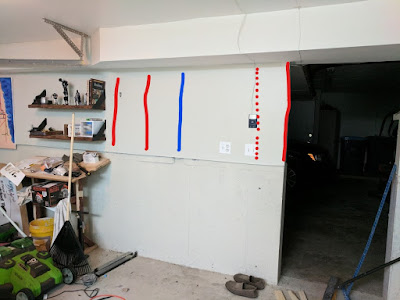
I ended up not quite sure where the studs were with the finder. There's obviously one in the door frame, and probably one by the switches. But the blue line is a pipe, you can see it between the drywall and foundation. And the red lines on the left are probably studs, but they're way off any standardized measurement I could figure out. Of course, just like everything else in this house.
Testing some cleat fit. Had to work around some stuff already on the wall.
At least I didn't hit anything electrical drilling into the wall, so I think we're all good. Unfortunately, the cleats are only going on the top half of the wall since I don't really feel up to adding masonry bits to attach more. But that might actually work out better, since I want to park stuff under the shelves once they're all up.

At first, all I really want to get out of this is more floor space to park the mower, and a custom shelf for my circular saw. But the more I thought about it, the more I realized these could hold my planes, the jig saw, the sander, the router I still haven't used...the list grew and grew. Plus, looking at it now putting the table saw under there would mean less carrying back and forth every time I use it, which would be pretty great. I love this project.
Plus some extra split 1x4's I think I'll use later.

With the other interview looming, even though the cleats were on I only had time to build a big shelf and try it out, but so far it looks great. Thankfully I have plenty of scrap for more shelves and boxes to store stuff with, and a long holiday weekend gave me some extra time to get back to them. More on that later. But a big thumbs up on this project so far. Not only is it helping with storage, each shelf becomes another gadget to put together for a custom solution. So good. 

Tuesday, October 3, 2017

Quiet down already

Well I messed that up.

The color block painting got off to a good start but I've been messing it up ever since then. Tried to lighten the top, messed that up. Tried to blend in the middle, messed that up.

Added a bigger top section, messed that up. Tried to clean up the orange framing, messed that up.

Sigh. At this point every time I pick up a brush my inner monologue starts yelling at me about not messing something else up. Not a good way to finish a painting.

If I'm not getting the benefits of the mental quiet that comes with painting I think I'm going to take a little break from this, and probably from most project time in general. The kids are super busy, and classes and interviewing are already starting to take a toll. Yikes. I'm sure I'll need some stress relief pretty soon though.